AI Integration (MCP)
Computer only
The MCP server is part of the computer app (Linux, macOS, Windows). The Android app does not include it.
Experimental
AI integration is experimental. Tool support and behaviour vary across models and clients. Results are not guaranteed — always review what the AI creates or modifies.
Commandeck includes an MCP (Model Context Protocol) server. Once configured, your AI assistant can read and manage your buttons directly — no copy-pasting, no explaining your setup.
"Add a button called 'Restart Nginx' that runs
sudo systemctl restart nginxin the Server category"
Requires Commandeck 2.0.17 or newer (Pro)
MCP is a Pro feature. The instructions below launch the server straight from the Commandeck app itself with --mcp-server — available in 2.0.17+. Check your version in Menu ☰ → About.
Step 1 — Enable MCP access in Commandeck
MCP is off by default. Turn it on once:
Preferences → Desktop Integration → Allow MCP access
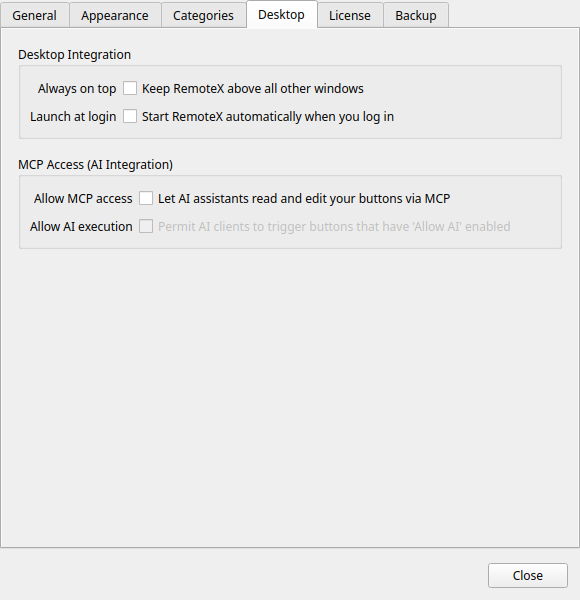
Step 2 — Find your Commandeck MCP command
The MCP server is built into the Commandeck app — you launch it by running the app with the --mcp-server flag. The exact command depends on how you installed Commandeck. Find yours below; you'll plug it into your AI client in Step 3.
This is the most common install. Use the Pro AppImage (MCP is a Pro feature), and make sure it is executable (chmod +x once):
/full/path/to/Commandeck-Pro-2.0.17-Linux-x86_64.AppImage --mcp-server
Use your actual file name and path (the download embeds the version and architecture). Tip: drag the AppImage into a terminal to get its full path.
The command lives inside the .app bundle:
/Applications/Commandeck.app/Contents/MacOS/Commandeck --mcp-server
Use the path where you installed Commandeck (quote it if it contains spaces):
"C:\Program Files\Commandeck\Commandeck.exe" --mcp-server
Test it once
Running the command directly should just sit there waiting for input (it speaks JSON-RPC over stdin/stdout) — that means it works. Press Ctrl+C to quit. If it prints "the MCP server requires Commandeck Pro", you're using the free build.
In the rest of this page, <your Commandeck command> means the executable from this step (e.g. the AppImage path) and --mcp-server is its argument.
Step 3 — Configure your AI client
Pick your tool below. The setup is done once; after that it works automatically.
Config file location:
| OS | Path |
|---|---|
| Linux | ~/.config/Claude/claude_desktop_config.json |
| macOS | ~/Library/Application Support/Claude/claude_desktop_config.json |
| Windows | %APPDATA%\Claude\claude_desktop_config.json |
Add this to the file (create it if it doesn't exist), using your command from Step 2:
{
  "mcpServers": {
    "commandeck": {
      "command": "/full/path/to/Commandeck-Pro-2.0.17-Linux-x86_64.AppImage",
      "args": ["--mcp-server"]
    }
  }
}
On macOS the command would be /Applications/Commandeck.app/Contents/MacOS/Commandeck; on Windows, the full path to Commandeck.exe. Restart Claude Desktop — Commandeck appears as a connected tool.
Run this once in a terminal (substitute your command):
claude mcp add commandeck /full/path/to/Commandeck-Pro-2.0.17-Linux-x86_64.AppImage --mcp-server
To verify: claude mcp list
Edit ~/.cursor/mcp_config.json:
{
  "mcpServers": {
    "commandeck": {
      "command": "/full/path/to/Commandeck-Pro-2.0.17-Linux-x86_64.AppImage",
      "args": ["--mcp-server"]
    }
  }
}
Restart Cursor.
Edit ~/.codeium/windsurf/mcp_config.json:
{
  "mcpServers": {
    "commandeck": {
      "command": "/full/path/to/Commandeck-Pro-2.0.17-Linux-x86_64.AppImage",
      "args": ["--mcp-server"]
    }
  }
}
Restart Windsurf.
Add to .continue/config.yaml in your project:
mcpServers:
  - name: commandeck
    command: /full/path/to/Commandeck-Pro-2.0.17-Linux-x86_64.AppImage
    args:
      - --mcp-server
MCP tools are only available in Agent mode.
Open WebUI connects to tools over HTTP, not stdio. Use mcpo (the official Open WebUI proxy) to bridge Commandeck.
Run mcpo as the same user that runs the Commandeck app
The server reads the buttons of whoever launches it. Each Linux/macOS user has their own Commandeck config (~/.config/commandeck). If you run mcpo as a different user than the one you use Commandeck with, the AI will see the wrong (or empty) set of buttons. Launch mcpo from a terminal logged in as your normal desktop user.
Step 1 — Install mcpo (once):
pipx install mcpo
# no pipx? a virtual environment also works cleanly:
#   python3 -m venv ~/.mcpo-venv && ~/.mcpo-venv/bin/pip install mcpo
# (plain `pip install mcpo` often fails on Linux with "externally-managed-environment")
Step 2 — Find the local IP of the machine running Commandeck (only if Open WebUI is on another machine):
hostname -I | awk '{print $1}'
Note this IP — you'll need it in Step 4.
Step 3 — Start the proxy (keep this terminal open):
mcpo --port 8000 -- /full/path/to/Commandeck-Pro-2.0.17-Linux-x86_64.AppImage --mcp-server
You should see: Uvicorn running on http://0.0.0.0:8000
Avoid copy-paste line breaks
Keep the command on a single line. If a wrapped command pastes as several broken lines, save it as a small script instead — create start-mcpo.sh containing the one line above, then run bash start-mcpo.sh.
Step 4 — Add the tool server in Open WebUI:
Go to Admin Panel → Settings → Tools (older builds: Integrations → Manage tool servers) → + and fill in:
| Field | Value |
|---|---|
| Type | OpenAPI |
| Name | commandeck |
| URL | http://<ip-from-step-2>:8000 |
| Auth | None |
Use the machine's IP, not localhost
If Open WebUI runs on a different machine (e.g. a home server), localhost would point to that server — not to the machine where mcpo is running. Use the IP from Step 2. From the Open WebUI machine, you can confirm the path with: curl http://<that-ip>:8000/openapi.json (it should return JSON). If it doesn't, open port 8000 in the firewall of the machine running mcpo.
Step 5 — Enable the tool in a chat:
Start a new chat, click the + (tools) icon near the input field, and enable commandeck.
Tip
This works with any backend supported by Open WebUI — llama.cpp, Ollama, OpenAI-compatible APIs, etc. The tool layer is independent of the model. Tool-calling support varies by model — instruction-tuned models generally work best; smaller local models may need the system prompt below to call tools reliably.
When to restart mcpo
mcpo launches the Commandeck MCP server as a subprocess at startup and reads its tool list once. Restart mcpo whenever you:
- Enable or disable Allow MCP access in Preferences (if you start mcpo before enabling it, it sees zero tools)
- Update Commandeck to a new version
To restart: press Ctrl+C in the mcpo terminal and relaunch Step 3 — or, with the systemd service below, systemctl --user restart mcpo-commandeck.
Step 6 — (Optional) Make mcpo persistent across reboots
Create a systemd user service so mcpo starts automatically at login (run this as your normal desktop user):
mkdir -p ~/.config/systemd/user
cat > ~/.config/systemd/user/mcpo-commandeck.service << 'EOF'
[Unit]
Description=mcpo proxy for the Commandeck MCP server

[Service]
ExecStart=%h/.local/bin/mcpo --port 8000 -- %h/Apps/Commandeck-Pro-2.0.17-Linux-x86_64.AppImage --mcp-server
Restart=on-failure
RestartSec=5

[Install]
WantedBy=default.target
EOF

systemctl --user daemon-reload
systemctl --user enable --now mcpo-commandeck
Useful commands:
systemctl --user status mcpo-commandeck    # check status
systemctl --user restart mcpo-commandeck   # restart after enabling MCP / updating
systemctl --user stop mcpo-commandeck      # stop
journalctl --user -u mcpo-commandeck -f    # live logs
Note
Adjust the paths in ExecStart: point to your AppImage, and run which mcpo to find mcpo's path if it isn't ~/.local/bin/mcpo (e.g. inside a venv).
Recommended system prompt
Paste the prompt below into your AI client's system prompt field. It primes the model to call
help first, follow correct lookup workflows, and decompose complex shell commands into Commandeck
components rather than pasting them as-is.
You are an assistant for Commandeck, a desktop application on Linux, macOS or Windows. Commandeck
lets the user run commands by clicking buttons, like a remote control. You can create, read,
and modify the user's buttons, machines, and profiles using your tools.

Rules:
- Before doing anything, call the help tool to read the instructions.
- When the user explicitly names a button, use get_button(name="X") directly. When you don't
  know the exact name, use list_buttons.
- Never call get_button before create_button.
- For buttons: a duplicate means SAME NAME, not same command. If no button has the exact same
  name, create it without asking.
- For machines: a duplicate means SAME HOST address. Always call list_machines and check by
  host before creating.
- For profiles: a duplicate means same name. Call list_profiles before creating.
- When asked to change a property, always apply the change. Never decide the current value is
  already acceptable.
- In multi-step requests, if a required resource exists, use it and proceed.
- When you need a machine ID or profile ID, always look it up first.
- Write each command in the right shell for its target: PowerShell or cmd for a Windows machine,
  bash/sh for Linux or macOS. Set the button's os field to match. Check each machine's os with
  list_machines; for a local button (no machine) use this computer's OS. Never give a Windows
  machine a bash command, or a Linux/macOS machine a PowerShell command.
- The user can install ready-made button packs from the gallery: call list_packs to see what is
  available and what has updates, then install_pack / update_pack / uninstall_pack to manage them.

When a user asks you to add or refactor a shell command, decompose it before creating a button:
1. `cd /some/path` → Execution Profile working_dir (strip from command)
2. `sudo -u user` wrapper → run_as_user on the profile or button's run_as field
   (strip the wrapper, keep the inner command)
3. Opens an interactive shell (bash, zsh, exec bash) → execution_mode = "terminal"
4. Produces output the user wants to read → execution_mode = "output"; fire-and-forget → "silent"
5. What remains after stripping context wrappers is the command field.

Example: `sudo -u www-data bash -c 'cd /var/www/myapp && git pull'`
→ Create Profile: name="Web Deploy", run_as_user="www-data", working_dir="/var/www/myapp"
→ Create button: command="git pull", execution_mode="output", assign that profile
In Open WebUI, go to Admin Panel → Settings → System prompt and paste the prompt above (or into the chat's system prompt field in Model Settings).
Claude Desktop does not expose a system prompt field. The help tool description is
self-explanatory for Claude — no extra prompt needed.
Paste the prompt into whatever system prompt or instruction field your client exposes before the conversation starts.
What your AI can do
Buttons
| Tool | Description |
|---|---|
help |
Return the full workflow guide — always call this first |
list_buttons |
List all buttons, optionally filtered by category |
get_button |
Get details of a button by name or ID |
create_button |
Create a new button (name, command, category, color, icon, execution_mode, profile, machines…) |
update_button |
Modify any field on an existing button — call get_button first to get the ID. Changing its command, run-as user, profile or machines withdraws its Allow AI to run this button until you tick it again |
execute_button |
Run a button's command and return its output (off by default — see Allowing AI execution) |
delete_button |
Delete a button by ID |
Categories
| Tool | Description |
|---|---|
list_categories |
List all category names |
SSH Machines (Pro feature)
| Tool | Description |
|---|---|
list_machines |
List configured SSH machines (name, host, user, port — no private keys) |
create_machine |
Add a new SSH machine |
update_machine |
Rename or reconfigure an SSH machine — call list_machines first to get the ID |
delete_machine |
Delete an SSH machine by ID |
Saved "Run as" (profiles) (Pro feature)
| Tool | Description |
|---|---|
list_profiles |
List all saved "Run as" (profiles) |
get_profile |
Get details of a profile by name or ID |
create_profile |
Create a reusable profile (run_as_user, working_dir) |
update_profile |
Modify an existing profile — call get_profile first to get the ID |
delete_profile |
Delete a profile by ID |
Button Packs — ready-made button sets from the public gallery
| Tool | Description |
|---|---|
list_packs |
List gallery packs, each with installed and update_available flags |
install_pack |
Install a pack onto machines (signature-verified packs only) |
update_pack |
Update an installed pack, keeping your edits, targets and positions |
uninstall_pack |
Remove every button from a pack |
export_pack |
Export selected buttons to a shareable .cdpack file |
Variables
| Tool | Description |
|---|---|
list_variable_values |
List your saved values for command {{variables}} |
Review before deleting
delete_button, delete_machine, and delete_profile are available via MCP. Always verify
the correct item with get_button or list_machines before asking your AI to delete anything.
Refreshing the grid after AI changes
After an AI creates or modifies a button, press F5 (or menu → Refresh Buttons) to reload the grid without restarting Commandeck.
Tip for updating buttons
If the AI says it cannot update a button, ask it to call get_button with the button name first to retrieve the ID, then call update_button with that ID.
Allowing AI to run buttons
By default, your AI can read and edit buttons but cannot run them. To let it actually trigger commands, you must opt in at three levels — any one of them blocks execution if disabled.
1. Global toggle — Preferences → Desktop Integration → Allow AI execution
Off by default. This is the master switch for the whole feature.
2. Per-button opt-in — Edit a button → Behaviour → Allow AI to run this button
Off by default on every button, including those you've already created. Enable it only for buttons whose commands you're comfortable letting an AI trigger autonomously — e.g. read-only checks (df -h, systemctl status), idempotent operations, safe deploys.
3. Confirmation handshake — Edit a button → Behaviour → Confirm before running
When this is on, the AI cannot run the button silently. It receives a requires_confirmation response containing the exact command and is instructed to show it to you and wait for your approval before re-calling with confirmed=true. Recommended for any sensitive command (restarts, deletions, sudo).
Audit log: Every MCP execution is appended to ~/.config/commandeck/.mcp_executions.log with the timestamp, button name, target machine, exit code, and duration.
Limitations:
- Buttons with
Open in terminalmode cannot be executed via MCP — there is no terminal in a headless AI context. The AI receives an error if it tries. - Output sent back to the AI is capped (4 KB stdout, 2 KB stderr) to keep its context manageable. The full output is still in the log if you need it.
- Multi-target buttons require the AI to specify which machine to run on. If it doesn't, the server returns the list of valid targets and asks for clarification.
Security
The MCP server uses stdio transport — when a client (Claude Desktop, Cursor, …) launches it directly, it runs as a subprocess communicating only through stdin/stdout. No network port is opened, and only the process that launched it can talk to it.
When you use mcpo (Open WebUI), an HTTP port (8000) is opened on the machine running mcpo. Make sure that port is not exposed to untrusted networks — keep it on your LAN, behind your firewall.
Warning
When MCP access is enabled, your AI assistant can create, modify and delete buttons. Disable the toggle in Preferences when you don't need it. Button execution is a separate, opt-in feature — see Allowing AI to run buttons.